Description automatically generated" title="How to setup free own mail server"/>
If there is a need to create your own email server for your company or personal use for free (it’s actually for small businesses) so this information gives the point of interest. As a result, the mail can be sent over the world via your free mail server for the domain.
Why could we make your own email server?
Pros
- Our own mail domain
Sending a company’s mail from its domain is a good idea to be business attractive. E.g. sales@mycompany.com.
- Unlimited users
We can create as many users as we want without extra pay.
- Unlimited targeting
Unlimited target addresses while sending mail. In external paid services we have to pay per user.
- All the data is under our control
Nobody will be able to see our internal business conversation.
- Transmission control
Some public mail servers couldn’t send mail to some domains, e.g. protonmail.com due to country limitations. Hosting your own email server gives us the ability to manage such limitations.
Cons
- Support effort
Yes, this is the same headache as establishing our own web server such as keeping the service online, administration, etc.
- Manual setup
Special knowledge is required to set up all properly. But, if you are ready for this, we will give it in this article.
- Probably sending limitations
Some static address ranges can be blacklisted. But there is a solution to avoid this.
There are three main steps to establish and set up a self-hosted mail server.
Setting up IP and DNS
Ensure public static IP, public domain, and PTR record
These are the main requirements to run your own email server.
- Public and static IP address
The IP address of our own email server should be public and the same in time. Ensure it from your hosting or internet service provider.
- The domain name points to the IP
DNS record of the public domain name of our own mail server should point to that IP address. It can be managed under the DNS settings of your domain name provider.
- The IP points to the domain name
Further, the back DNS record (named PTR) must point our IP to the domain name of our own mail server. You can ask your hosting or internet service provider to set up it to your public domain name. It can be easily checked by your IP via a special online checker like this, or Windows’s ‘nslookup’ tool and ‘host‘ command in UNIX-based systems.
Configure DNS MX record
A mail exchanger record (MX record) specifies the mail server responsible for accepting email messages on behalf of a domain name.
So, we need to point domain name of our self-hosted mail server that will process mail of our main domain. E.g. if our domain is mycompany.com, the mail server is mail.mycompany.com, then the DNS record for mycompany.com will be:
Type | Host | Value | Priority | TTL |
|---|---|---|---|---|
MX | @ | mail.mycompany.com | 10 | 1 min |
- Priority is used when our domain has more than one mail server.
- TTL can be set to any preferable value and the lowest value is used to apply DNS changes as soon as possible while setting up our own email server.
Configure DNS DKIM record
DomainKeys Identified Mail (DKIM) is an email security protocol that attaches an encrypted digital signature to an email. The receiving server verifies it with a public key to ensure the email hasn’t been tampered with.
So, we need private and public keys. It can be generated by an online tool like Power DMARC Toolbox – DKIM Record Generator, or by OpenSSL commands (provided for Windows):
- Create private key
openssl.exe genrsa -out private.key 2048
- Create public key from private
openssl.exe rsa -in private.key -pubout -outform der 2>nul | openssl base64 -A >> public.key.txt.
And our DNS record will look like this:
Type | Host | Value | TTL |
|---|---|---|---|
TXT | selector._domainkey | v=DKIM1; k=rsa; p=public_key | 1 min |
where:
- selector – self-chosen identifier e.g. ‘mysrv’ that will be used in our mail server application.
- public_key – our public key encoded by base64 algorithm.
- TTL has the same meaning as in the previous paragraph.
Configure DNS SPF record
Sender Policy Framework (SPF) is an email authentication standard that checks the sender’s IP address against a list of the domain owner’s authorized IPs to validate incoming email.
Our DNS record will look like this:
Type | Host | Value | TTL |
|---|---|---|---|
TXT | @ | v=spf1 a mx include:relayer_name -all | 1 min |
- relayer_name – optional external mail relay server name.
- TTL has the same meaning as in the previous paragraph.
The handy SPF record online generator can be used.
Optional DNS stuff
Some fields are not necessary but nice to have.
- DMARC
Domain-based Message Authentication, Reporting, and Conformance (DMARC) record enables our hosted own email server to declare a policy on how other email servers should react to inauthentic messages.
- BIMI
Brand Indicators for Message Identification (BIMI) is a new standard created to make it easier to get our logo displayed next to our message in the inbox. Additionally, BIMI is designed to prevent fraudulent emails and aid deliverability as well.
- TLS-RPT
TLS Reporting gets daily aggregate reports with information on emails that don’t get encrypted and fail to deliver.
All these records can be generated via Power DMARC Toolbox.
Choose and run a mail server application
Check that your hosting allows installing other software. If so, any appropriate email server application can be used. E.g. there is a free hMailServer for Windows that provides all needed functions with minimum resource usage. For UNIX-based systems, there are many free email servers such as Exim Internet Mailer or iRedMail. You are welcome to put another good software in the comments below. Detailed choosing of such software deserves a separate article.
For Windows, we recommend using hMailServer due to its correlation with our principles of small and effective software.
Initializing
When the software is chosen and installed, it’s a time setting up your own email server application.
- Domain and users
We should add users of our free mail server for the domain. They can be added or removed at any time.
- Security
To provide an appropriate level of security we should add an SSL certificate for our domain.
Next, DKIM should be configured. We need to add the private key and selector obtained above. Also, header and body methods should be set to ‘relaxed’, signing algorithm should be set to ‘SHA256’ for compatibility with modern mail transmission checking.
- Spam protection
Finally, don’t forget to set up antispam checking by special blacklist hosts such as spamhaus.org to protect our mail server users from spam messages.
E-mail protocols
We should set up three e-mail protocols that are needed to send and receive mail.
SMTP
SMTP is used to receive incoming and send outgoing mail from/to other mail servers. And it allows our domain users to send their messages.
- 25 port
This port is required to manage incoming connections from other mail servers. The secure method should be set to STARTTLS.
- 587 port
It is needed for the mail clients of our own mail server. The secure method should be set to STARTTLS.
- 465 port
It can be needed for the legacy mail clients of our self-hosted mail server. So, the secure method should be set to SSL/TLS.
POP3, IMAP
POP3 and IMAP are used by separate mail clients like Outlook on PC or any mail client on our mobiles. It allows our domain users to manage their messages.
The 993 port should be used for secured IMAP connections and 995 for POP3. The secure method should be set to SSL/TLS (not STARTTLS) to be compatible with most clients. The ports 143 for IMAP and 110 for POP3 can be set as well but they are not recommended for use due to their insecurity.
Checking
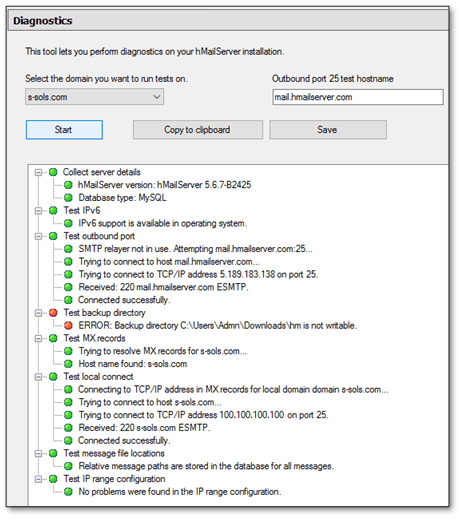
So, when all is set up, we can test our own email server by sending an email to somebody from our users’ list. Additionally, some email application has self-diagnostic like hMailServer that shows the work-ready status of all subsystems (see below).

Now, it’s time to check sending to an external address.
Gmail.com account
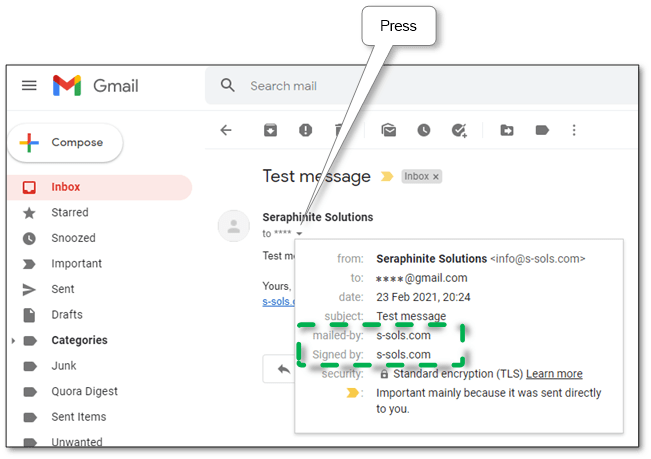
If we have a Gmail.com account, we can also send a test email to our Gmail address. Then open our email in Gmail webmail, click ‘show details’.

If there is ‘signed-by: our domain’, our DKIM signature is well configured. If there is ‘mailed-by: our domain’, our SPF is OK.
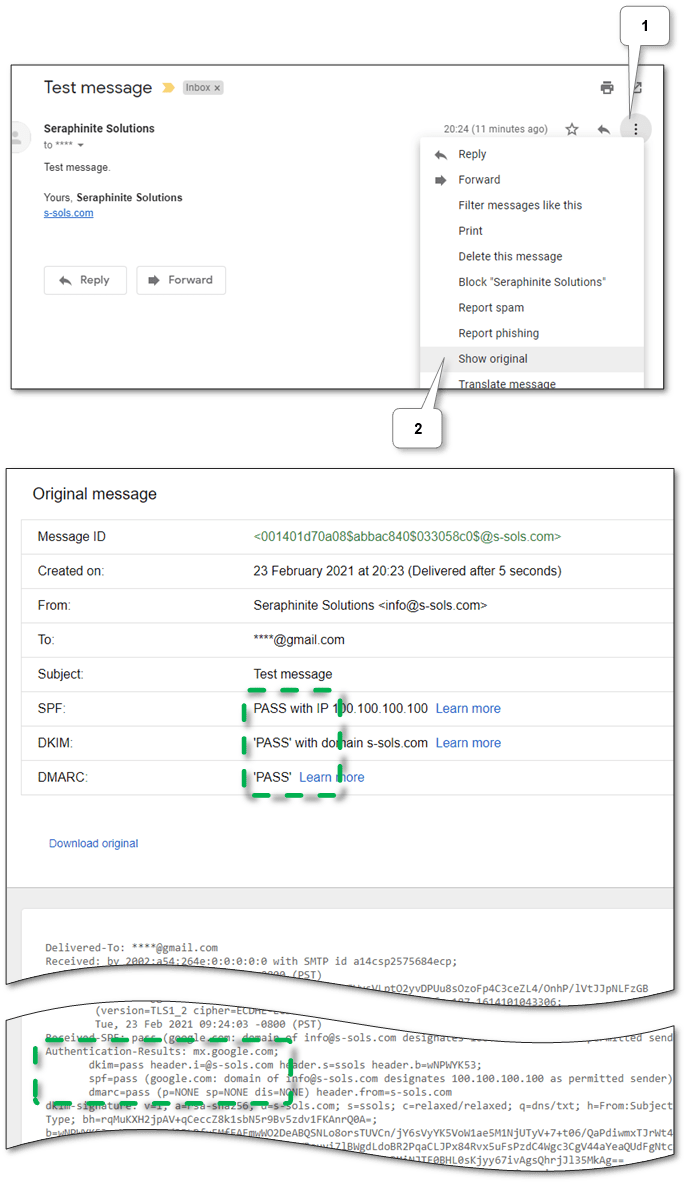
Then, ensure passed verification status of our sending in the raw headers.

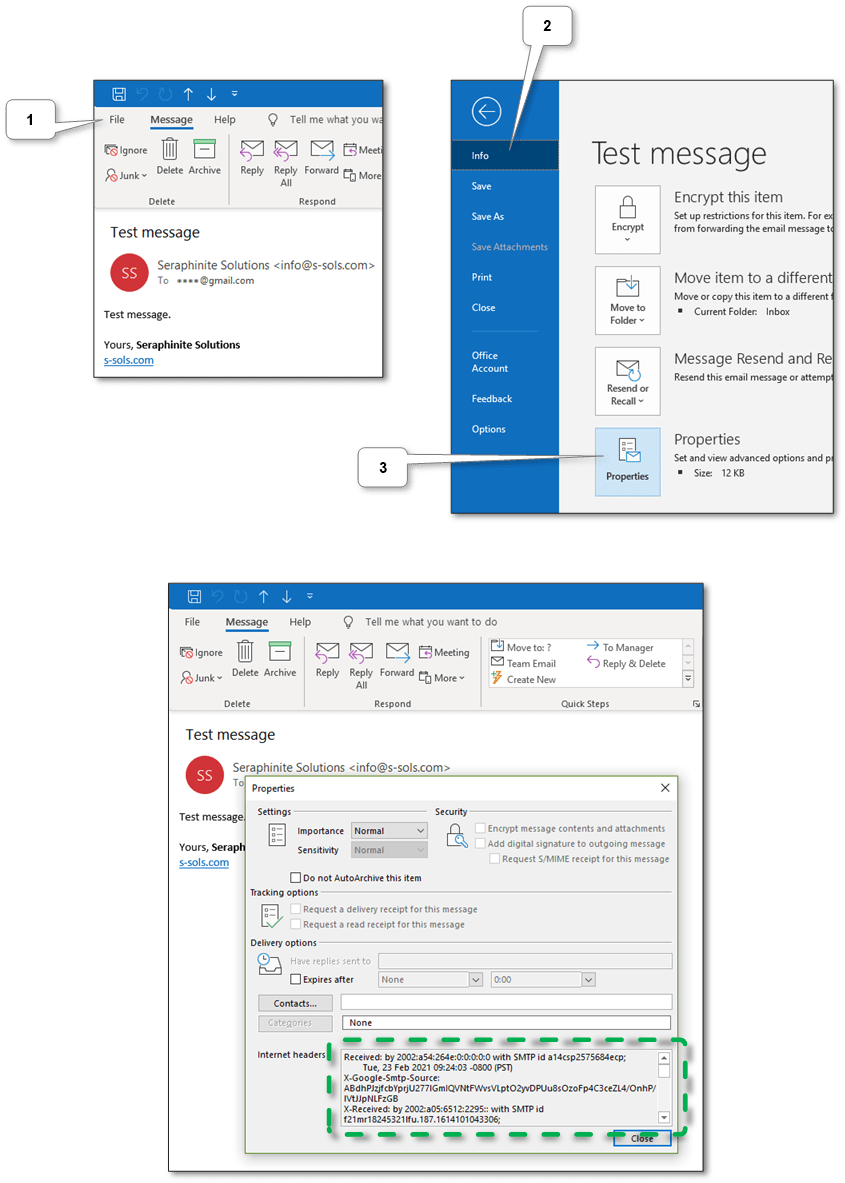
Also, in Outlook we can see the same headers in the message properties.

Special online services
There are a lot of online services that can check email sending. Below are some of them.
This service allows testing email server configuration such as DKIM and SPF by sending the email to provided generated mail address. We need just to follow the on-screen instructions. The test results will be displayed on the screen.
Provides the same functionality as the previous service. The test results will be sent to the sender’s address.
To test message sending here we need to send a special message to tester@email-test.had.dnsops.gov. The test results will be sent to the sender’s address.
This service provides only lite checking of all attributes, but handy tools listed above.
So, if all are configured correctly but our server exists in spam blacklists we should whitelist our own mail server. See below.
Whitelist your own email server
So, if all mentioned above are tuned correctly, other email servers still could mark messages as spam and reject them. It happens when the IP (or its range) of our domain is included in some blacklist. The most often reason for that is some neighbor IPs were used to send spam messages.
Whitelisting in most known sources
So first, let’s check IP (and domain if necessary) online for existence in any blacklists. E.g. it can be checked in any online checker that can be found via search. E.g. MXToolBox does checking in the most popular blacklists. And we recommend checking it in multirbl.valli.org too due to it shows many blacklist sources and show trust of each one. Then, we should sequentially look at each result item and read recommendations on how to whitelist our IP in a particular blacklist source. Most of them allow do that but rarely don’t like UCEPROTECT®-Network.
Whitelisting in particular mail servers
Some servers like Outlook have their own blacklists. The checking is easy – your mail server app will notify you about failed delivery in the mail client. Most mail servers provide unblock URLs in the response. So, we need to go by such URLs and follow the instructions like this.
Blacklisting workaround
If some official blacklist doesn’t allow whitelisting or someday mail stops sending to a particular email domain – don’t panic – we can use external SMTP relay services. They allow use them as gateways or proxies while sending mail.
We recommend using it as the cheapest – it allows sending 20K emails for free per month and has a low cost for extra sending.
It’s another good service that allows sending 9K emails for free per month with a limit of 200 per day.
In each service, we should register and validate our mail server domain. After approving, each one gets instructions on what should be adjusted to our DNS and our own mail server application setting. For DNS it’s a DKIM, SPF, and DMARK settings, for application is an SMTP relay server address, port, and credentials.
Conclusion
So, now we can use all benefits of running your own email server. We hope that this material will help you reach your goal most efficiently. If you have any questions or suggestions according to this theme welcome to the discussion in our comments or via our email.
More information can be discovered in the original post about How to setup free own mail server and on the main site.
Comments
Post a Comment